Glute Bridge: Benefits, Technique and Variations
Learn how glute bridges strengthen the glutes and support core stability, with step-by-step instructions for four variations and common mistakes to avoid.
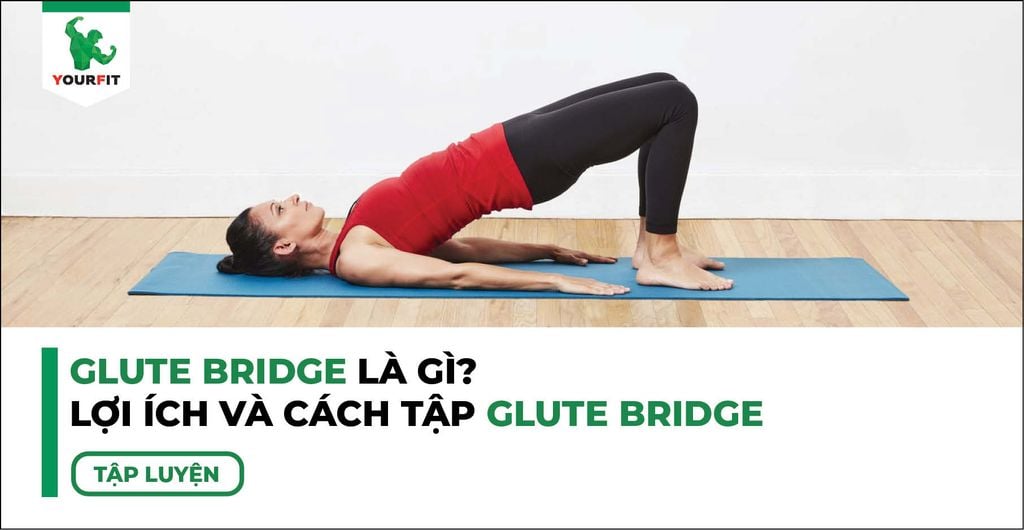
A glute bridge involves lifting your hips while lying on your back. This simple exercise can be performed at home without equipment to train the glutes, core stability and lower-back support. This guide explains what a glute bridge is, its benefits, popular variations and the technique details that matter.
1. What is a glute bridge?

The glute bridge is a lower-body exercise that trains hip extension. It primarily strengthens the glutes, with the hamstrings, core and lower-back muscles supporting the movement. Stronger hip extensors can support posture, everyday movement and glute development; they should not be treated as a guaranteed remedy for back pain.
Bridges also help you develop strength, improve awareness of the working muscles and practise controlled movement. They can be used to activate the glutes during a warm-up or performed for higher repetitions to develop endurance. The basic version requires little space and no equipment, making it accessible to many beginners at home or in the gym.
Variations include the glute bridge march, barbell glute bridge and single-leg bridge. Choose the version that suits your current strength and control.
2. Benefits of glute bridges

2.1. Support better posture
Regular bridges strengthen the glutes and spinal-support muscles involved in keeping you upright. Building their capacity can help you maintain comfortable posture while sitting and standing.
2.2. Train core stability
Although the glutes do most of the work, the abdominal muscles and obliques help stabilize the pelvis and trunk. This develops control around the midsection; the exercise alone does not selectively remove abdominal fat.
2.3. Develop the glutes
The gluteus maximus, the largest gluteal muscle, is the main muscle working during a bridge. Progressive training can improve its strength and shape. Bridges can be particularly useful in a routine for people who spend long periods at a desk, helping them train muscles that receive little challenge while sitting.
2.4. Strengthen the posterior chain
Bridges train hip extension and muscles along the back of the body. The posterior chain includes the calves, hamstrings, glutes and lower-back muscles, which contribute to posture, sport and everyday mobility.
3. How to perform popular glute bridge variations
3.1. Basic glute bridge
- Set up: Lie on your back with knees bent, knees approximately shoulder-width apart and feet flat on the floor. Start with your heels about 6–8 inches from your glutes, adjusting for your proportions. Rest your arms beside you with palms facing up.
- Lift: Press through your feet and slowly raise your hips until your shoulders, hips and knees form a straight line. Squeeze your glutes and brace your abdomen.
- Lower: Hold the top for 1–2 seconds, then lower your hips under control. Keep the muscles engaged rather than completely relaxing between repetitions.
- Repeat: Aim for 2–3 sets of 10–12 repetitions according to your ability. Take a 2–3-second pause as needed between repetitions, maintaining a steady pace without rushing or straining.
3.2. Glute bridge march
- Set up: Lie on your back with bent knees, feet flat and approximately shoulder-width apart, and heels initially 6–8 inches from your glutes. Place your arms beside your body, palms up.
- March: Raise your hips into the bridge. Hold the pelvis steady as you bring your right knee toward your chest, return that foot to the floor and repeat with the left leg. Keep your glutes and abdomen engaged.
- Lower: Hold a stable bridge for 1–2 seconds before lowering with control. Maintain tension throughout.
- Repeat: Perform 2–3 sets of 10–15 repetitions at a level you can control. Pause for 2–3 seconds when needed and avoid sacrificing technique for speed.
3.3. Barbell glute bridge
- Set up: Choose a manageable barbell. Lie on your back with knees bent, feet flat and approximately shoulder-width apart. Start with heels 6–8 inches from your glutes and adjust for comfort.
- Lift: Position the bar across the front of your hips and hold it securely with both hands. Press through your feet to raise your hips until the shoulders, hips and knees align. Squeeze the glutes and brace your abdomen.
- Lower: Pause at the top for 1–2 seconds, then lower slowly while keeping control of both your body and the bar.
- Repeat: Perform 2–3 sets of 10–12 repetitions as appropriate. Use a steady rhythm, with a 2–3-second pause when needed; do not rush or exceed your ability.
3.4. Single-leg bridge
- Set up: Lie on your back with bent knees, feet flat and about shoulder-width apart. Begin with heels 6–8 inches from your glutes. Place your arms by your sides with palms down.
- Lift: Raise your hips into a bridge and extend one leg forward, keeping that foot clear of the floor. Start with a clearance of about 5–10 cm. Keep the glutes and abdomen engaged and the pelvis level; complete the movement on both sides.
- Lower: Hold for 1–2 seconds, then lower your hips slowly without losing control.
- Repeat: Work toward 2–3 sets of 10–12 repetitions according to your ability. Pause 2–3 seconds as needed and maintain a controlled rhythm.
4. Technique points and common mistakes

The bridge looks simple, but small technique errors can reduce its benefit or cause discomfort. Use these checks to improve each repetition.
4.1. Moving too quickly
Take time to engage the abdomen, glutes and legs. Rushing or swinging through repetitions makes the movement harder to control.
4.2. Lifting the hips too high
Do not chase height by excessively arching your lower back. Finish with a straight line from your shoulders to your knees. Overextending the back can shift work away from the glutes and cause discomfort.
4.3. Failing to engage the glutes
Squeeze the glutes as you finish extending the hips. Keep the hips aligned with your shoulders and knees, and maintain that engagement on every repetition.
4.4. Losing contact with the floor
Keep the whole foot planted and press firmly through the heels. Foot placement changes how the hamstrings and glutes share the work. You can also try a heel distance of about 12 inches. These distances are starting points: adjust to your proportions until you can maintain a stable, comfortable bridge.
4.5. Choosing an unsuitable difficulty
Warm up first. Beginners should start with fewer repetitions and build gradually as strength improves. Stop if you experience lower-back pain, and ask a qualified coach to check your technique.
5. Conclusion
Understanding the bridge and its variations helps you select exercises that match your body and goals. Apply these technique points consistently, progress at a manageable pace and use the movement as part of a balanced training routine.